how to setup goad on windows with vmware
background
i’ve recently gotten back into red teaming quite heavily and decided that i wanted my own lab. whats better than GOAD? there are very few solutions that have enough exploits that allows me as a red teamer to test my payloads for opsec. the plan was to install goad and setup a few crowdstrike agents and elastic agents and go to town.
however, it’s come to my attention that a lot of people don’t know how to setup GOAD on windows using vmware. I guess it does have some difficulties and the original script was not intended to be used on windows in the first place. so i decided to write this blog post to (hopefully) make everyone’s life a little easier.
asrep-pre-req
there are a few pre reqs we need to make sure we have installed in order for this to be a smooth process:
- vagrant 2.3.4
- vagrant vmware utility
- vmware workstation
- an ubuntu vm on that vmware workstation
- this blog post :)
install vagrant
simply download and install the binary from this page. just be sure to select 2.3.4 as the version from the drop down.
install vagrant vmware utility
just as before, simply download and install the tool from here.
after both the tools are installed, run the following command:
vagrant plugin install vagrant-vmware-desktop
vmware install
download and install from the official vmware workstation site here. vmware recently became free for personal use so take advantage of that or use your awesome googling skills that you’ve been honing all these years and get ya self some k-e-y-s :D.
ubuntu vm
okay i’d hope that if you’re here then you know how to install and setup an ubuntu vm, this is mainly for the sole purpose of using ansible. so when you get this far run the following commands on the ubuntu vm:
sudo apt install git
git clone git@github.com:Orange-Cyberdefense/GOAD.git
cd GOAD/ansible
sudo apt install python3.11-venv
python3 -m venv .venv
source .venv/bin/activate
python3 -m pip install --upgrade pip
python3 -m pip install ansible-core==2.12.6
python3 -m pip install pywinrm
the following command is out of the GOAD directory, so if you’re copy and pasting make sure to cd ..
ansible-galaxy install -r ansible/requirements.yml
putting it all together
ok we’re at the long stretch now and its time to put this all together. we’ll start by downloading the repo on our windows host. we can do this a million ways (3) by downloading the zip file or git cloning the https/ssh versions of the repo. I’m sure someone will be creative and find other ways (or i didn’t look hard enough) but this is BESIDES THE POINT!
once you have the project locally, open an administrative powershell/cmd and run the following:
NOTE: WE ARE INSTALLING “GOAD” if you want “GOAD-LITE” or else, be sure to cd into that directory!
ANOTHER NOTE: be sure to check the IP addresses associated in your vagrant files for these machines. You need to make sure you know what the 3rd octet is or else..
example:
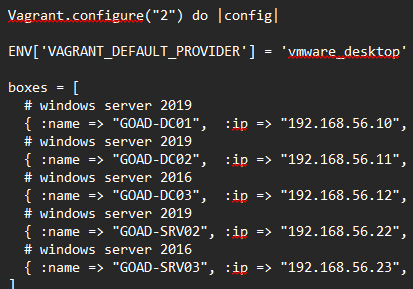
when I open my vagrant file I see the above, this will matter in just a second!
FINAL NOTE: IT IS IMPORTANT TO UNDERSTAND THAT THIS WILL REQUIRE AT LEAST 20GB RAM and 10 CPU cores. at its default state, its configured to give each VM 4GB ram and 2 cpu cores. i wouldn’t touch the cpu but i have had good luck with 2gb of ram on each vm :)
you can do this config here:

okay now i give you permission to run the command.
cd ad\GOAD\providers\vmware
vagrant up
hopefully this has no errors! it should open vmware and reboot machines and more, and eventually you will have 5 vms running. however they are NOT configured and they simply are running as default lame windows servers. so lets fix that!
the most important thing is that each vm (INCLUDING THE UBUNTU VM) have 2 network adapters, one NAT and one host-only adapter thats configured to match the ip scheme from the vagrant file.
to do this, open the virtual network editor in edit -> virtual network editor then click on “change settings” and “add network” from there you get a host-only adapter. all is left is for you to edit the ip at the bottom to have the same octet as your vagrant file:
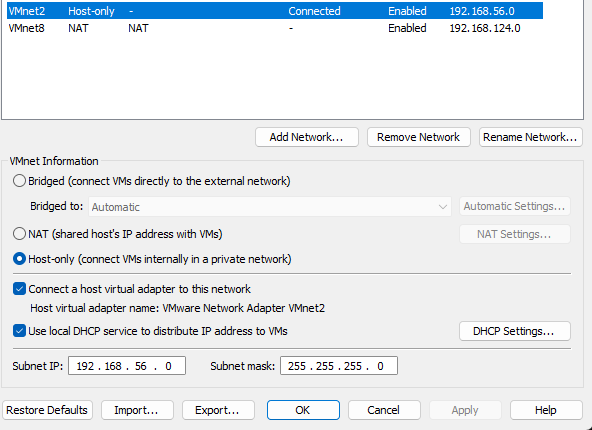
apply this to all machines, reboot them, and open the ubuntu machine.
finale
all you have to do is go to the directory where you install GOAD and run the following command:
be sure you cd into the ansible directory first
ansible-playbook -i ../ad/GOAD/data/inventory -i ../ad/GOAD/providers/vmware/inventory main.yml
if you face any errors use your deductions skills and fix it! but i dont think you’ll get any errors casue ur awesome. okay but for real all you have to do is run the command again unless its a bigger issue than that then reference this troubleshooting page.
conclusion
you should now have an awesome goad lab you can test your awesome ttps on.
if you have any questions you should look for my socials somewhere on this website and you’ll be able to reach out to me there :)
best, gerbsec